
I saw an idea about creating a photo album for each year of your life and quickly realized that my annual chapters would be dominated by the trips I took.
So instead, I decided to make a photo book for each big adventure. They are all the same size books and because I keep the same cover design, they look cohesive when stacked together.
Tip: Photo books are also a great gift idea for your travel companion at the next birthday/holiday, or even years later to help reminisce about your shared memories!
What service to use?
I use Shutterfly for all of my photo books. Snapfish, Picaboo, and Mixbook also specialize in photo books, with Snapfish being a close second in quality to Shutterfly (don’t believe me – search customer reviews for yourself). I love Shutterfly because they have many customization options. Whatever service you choose, I recommend sticking with the same one for all books, so your book series is consistent in quality and design. Because I have experience with Shutterfly, this post will highlight the features from that company.
Step 1 – Take Excellent Photos
A digital SLR camera is far superior, but if you don’t own one fear not! You can rent one for your trip from BorrowLenses.com (I’ve used them and they are easy/great quality!). It’s true that cell phone photography is improving dramatically in recent years, so you can still take beautiful shots without a real camera. The most important thing is having a good ‘eye for photography’, which can be taught! For a few basics to help improve the composition of your images, check out these two simplified articles from PhotographyMad and Lifehacker.
Step 2 – Edit/Upload Photos
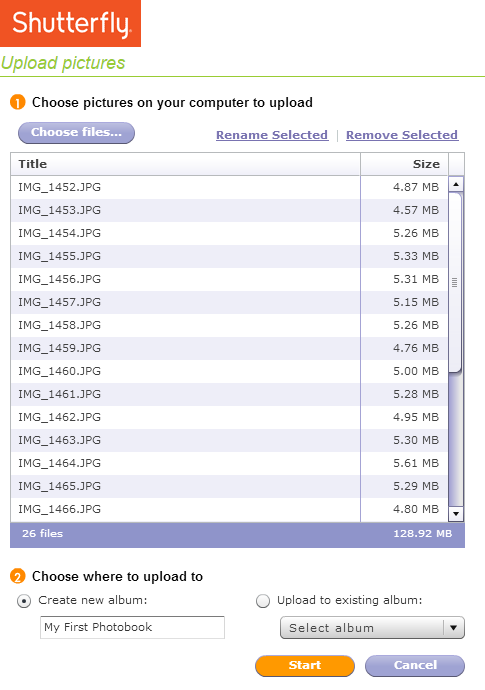
Before you show ANYONE, make sure you hone down those 500+ photos to 100 images or less. People generally don’t have patience for more than that, and we’ve all been trapped looking at so-and-so’s vacation photos while they scroll through duplicates/blurry ones. It’s rude; don’t be that person.
To edit the photos, I use Adobe Lightroom, which has a library of excellent FREE online tutorials andvideos. Note: Lightroom works best with images that are shot in RAW format (digital SLR Camera). Sometimes, you can edit/crop a photo that you’ve already taken to make it a good composition (example in this Digital Photography School post here.
Once you’ve got your favorite images, upload to Shutterfly and create an album. Depending how many photos you have, the quality of your images, and your connection speed, this could take a while.
Step 3 – Create your Photo Book
Shutterfly gives you three options for book creation: Custom, Simple or Make My Book.
Make My Book allows you to pick a theme and photos, then experts at Shutterfly will arrange them onto various pages. Once they are done, you have a chance to review and edit, but you could be editing longer than you think; if they leave out a memorable moment, highlight a photo you dislike, or put Shanghai and Hong Kong on the same page when they were days/weeks apart! If you aren’t creative or don’t have time, this might be a good option, but it’s also the least personal – only you know what parts of your trip were most important.
Simple jump starts the process by limiting your theme options and brings you right into the editor where you can select from pre-designed page layouts. This is good for first-timers, technology challenged individuals, or people who aren’t as perfectionist as I am.
Custom begins with selecting a theme/style for your book. Shutterfly has a great selection of scrapbook styles and themes to play with, but I’m pretty simplistic and I like basic black backdrops to let the photos speak for themselves. It also has the advantage of customizing each page layout template to precisely what you want. Example – you would prefer to have that image slightly higher on the page, or move the text box elsewhere.
Tip: To ensure that future photo books are identical (sometimes you forget what font or photo size went on the cover), instead of starting from scratch on your second book, make a copy of your first book and edit from there.
Once in the editor, add your photos to your “project” by either selecting this option in the Photos menu or pressing the Add Photos button in the bottom right.
I like to start with the Storyboard (first tab on the top left). This allows you to organize your trip with the big picture in mind. Do you want to devote one or two pages to a certain museum/landscape, or everything you did that day? Drag any photos you think you might want on those pages, as placeholders, knowing that you can switch out the photos or remove some later. I try to stick with 1-4 images per page, but there are times when I want many small images to describe a place. Add additional pages as needed.
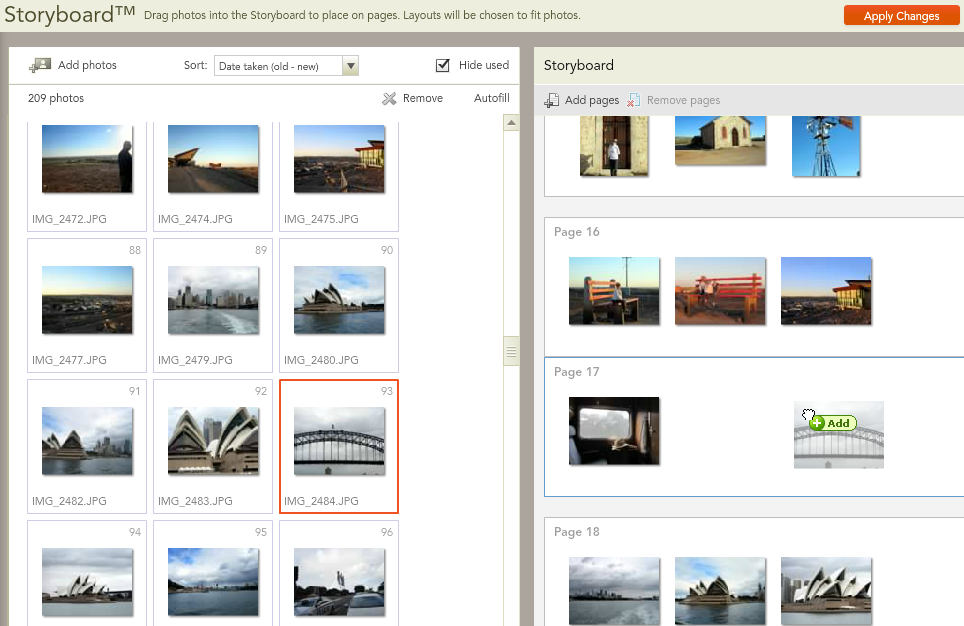
Once you have a general idea of your story, go through each page and select a better layout (left panel), rearrange the photos (drag and drop on the page), or switch out for a better photo (bottom panel, first tab), etc.
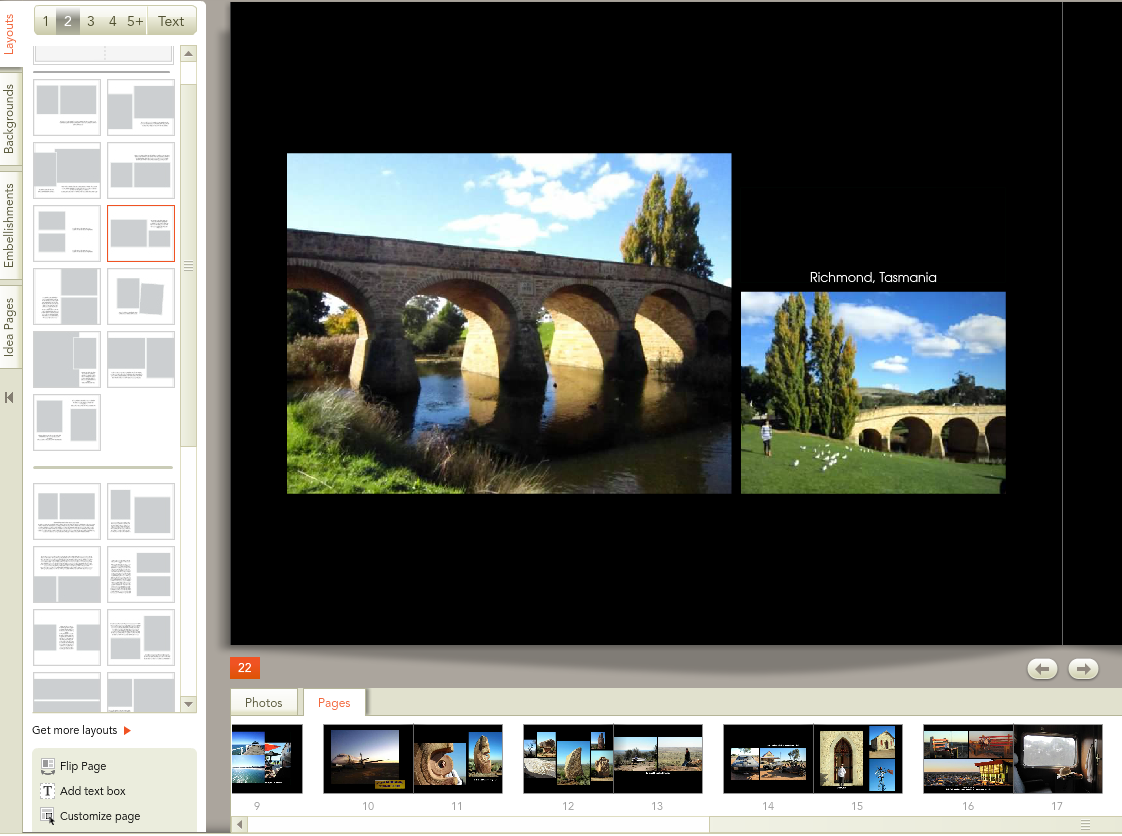
Tip: In the lower left side, click “Get more layouts” to upload other template pages. Sometimes “Flip Page” is all you need to make the current layout work.
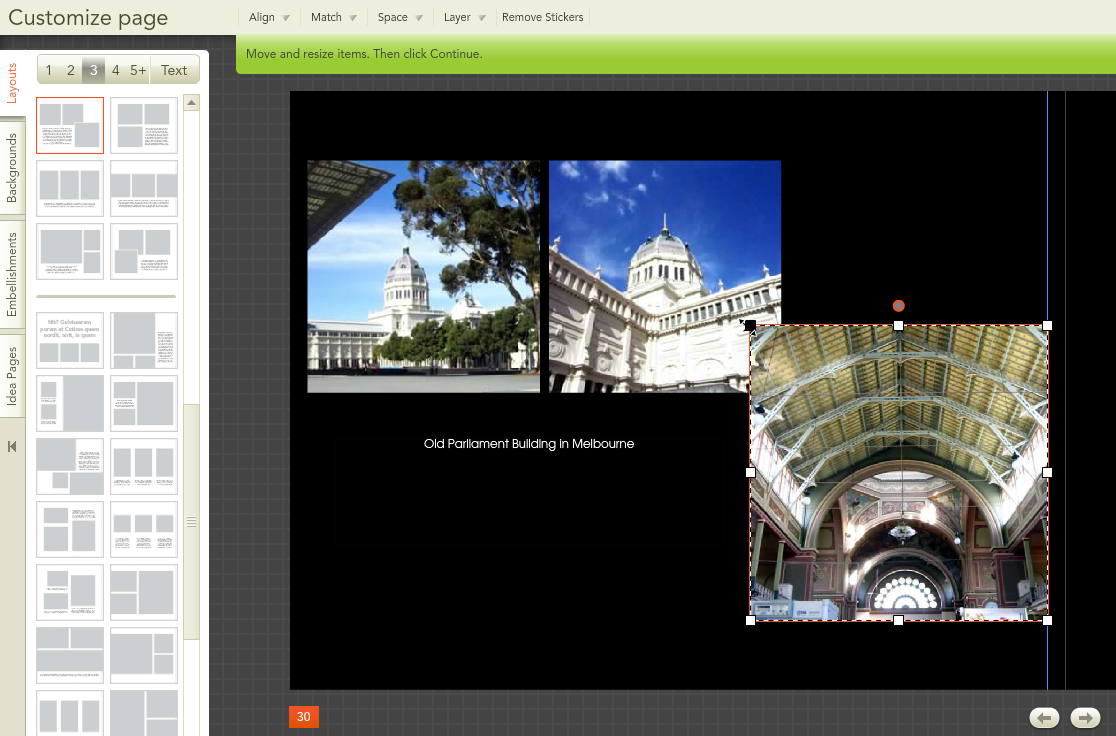
If you’re working in Custom mode, you can click “Customize Page” (lower left corner) and edit the size and shape of each individual photo or text box. As you re-size or move your image, blue guidelines appear to help line up with other objects or the page margins. You can also snap them to size/alignment using the pull-down menus at the top.
Other Page Ideas:
Intro Page – I always do an introductory title page with background information on the trip and one establishing shot of the group or setting.
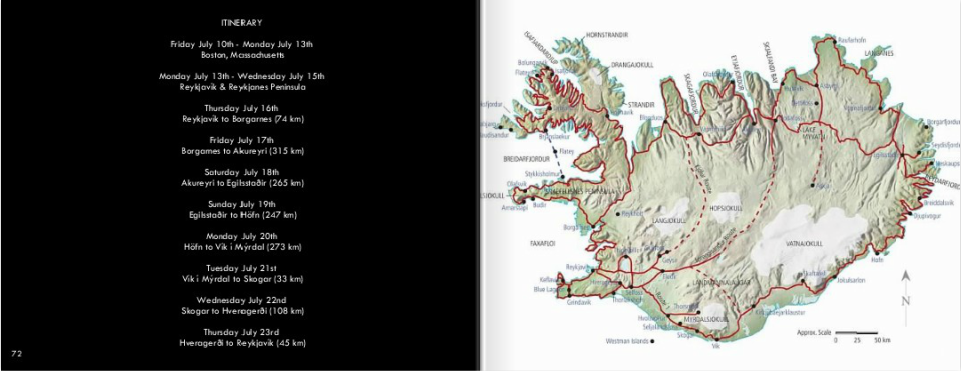
Itinerary Page – Sometimes it’s nice to remember where you were on certain days and how long you spent in each place. This can be at the beginning as a table of contents, or at the end for reference.
Map Page – For road trips, or multi-destinations, it can be helpful to give a point of reference to the locales pictured in the book (especially great if it was a road trip).
Step 4 – Review/Order
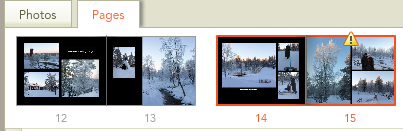
Review your book and flip through the pages with a fresh set of eyes. Realize if you need to cut a page or photo. Be on the lookout for yellow triangles with exclamation points; these will warn you if a photo is poor resolution, too close to the edge, or if text is misspelled. Don’t risk having a poor resolution photo, it’s not worth it; it looks unprofessional and discredits the rest of your images. If you can’t find something higher resolution, then make the photo smaller on the page.
Tip: Sign up for the Shutterfly mailing list to receive regular promotional offers. I usually get my entire photo book 40-50% off because I wait for these deals to order.
Step 5 – Share and Create More
After this project, I’m sure you have a few favorite photos, and Shutterfly makes it easy to turn those into other projects. Create a calendar, holiday postcard, buy prints or framed images to display around your house, etc, etc!
Get started with Shutterfly now – click here!